97-03 FAQ, Perf mods, common fixes read first

Posted by: HercMan(Rob)

97-03 FAQ, Perf mods, common fixes read first - 10/03/05 03:22 PM

1. Some definitions of some of the accronyms you may see or hear.
ABS= Anti-Locking Brake System
AWD = All Wheel Drive
CAI= Cold Air Intake
Cat= Catalytic converter
CV Joint = Constant Velocity Joint
DIC= Driver Information Center
DIY = Do It Yourself,
FWD = Front Wheel Drive
FWI = Fenderwell Intake
IAT= Inlet Air Temprature
KR= Knock Retard,
L32= S/C 3.8L replacing the L67
L36= NA 3.8L V-6 used in the 97-03 GPs and other GM models
L67= S/C 3.8L V-6 used in the GTP, Bonneville SSEI, Buick Regal GS
MAF= Mass Air Flow sensor
NA= Natural Aspiration
PCM= Powertrain Control Module,
RWD = Rear Wheel Drive
S/C= Supercharged
TC= Traction Control
TPS=Throttle Position Sensor
PCV= Positive Crankcase Ventilation


2. Q. What are the differences between the GT and the GTP?
A. The only differences between the GT and GTP are the powertrain equipment. GT uses the L36 with a 4T65E tranny and PCM written for the NA motor and weaker tranny and the GTP uses the L67 with the 4T65EHD Tranny and PCM written for the S/Cd motor.

4. Q. Can I swap my "catfish" SE front bumber cover and rear bumper cover for the GT/GTP bumper covers?
A. Yes you can. You will need to use a couple of brackets to properly secure the new pieces. The brackets are cheap and can be found at any GM dealership that sells parts or you may pull then from a junkyard.

5. Q. What Oil is the best?
A. That's a highly debated question. Synthetics are far superior to regular oil. Synthetic blends are about half synthetic half regular oil. Some people swear by Mobil 1 synthetic. I however believe in the differences between the brands is minimal and as long as you change your oil and filter on a regualar basis is sufficient.

6. Q. How often should I change my oil?
A. The standard answer is every 3,000 miles. How ever you should take a look at what type of driving you do. If your vehicle is on the highway running constant speeds for 75% of the miles you could easily stretch that out to 6,000 miles. But if you are driving in desert conditions ie. high heat and lots of dust then change it every 3,000 miles. If your vehicle spends most of it's life in stop and go city type driving, change your oil every 3,000 miles. If you take your car to the track and beat on that happy pedal alot then change it every 3,000 miles.

7. Q. A friend of mine has car X and I have car Y who will win in a race?
A. The only way to tell is to actually race. Knowing how to launch your car and when to shift is the biggest factor. In other words the driver makes or breaks the race. Alot of high performance cars require great driver skill in getting all that power to connect to the pavement. If the tires are spinning that car is going no where. Mean while your slow car is halfway through with the run.

8. Q. How fast is my car in the 1/4 mile?
A. There are lots of variables when it comes down to 1/4 mile performance. Altitude, temprature, humidity, tire pressure, vehicle wieght, driver skill, track conditions the list goes on and on. The only way to know is take the car to the track and find out. Even then you'll have multiple runs on different days and get different results. Even dedicated car magazines will have varying performance data do to the different conditions and drivers.
Posted by: HercMan(Rob)

Re: 97-03 FAQ, Perf mods, common fixes read first - 05/13/06 07:40 AM

EXHAUST MODS
Hercman's comments
"The only way to get a mean sounding exhaust will be if you do a cam swap.

The SLP loudmouth is just that it's loud. Remember you have a V6 and just adding in new exhaust will never get you that V8 sound. If you want to do a cat back exhaust your best money spent would be to go to a shop and have one made. Alot of us use Flowmaster 40 series. I have the super 40s and love them. There are a few other brands but for the most part FMs seem to be the favorite here.

For mufflers go to ebay and use performance peddler. They have bout the best prices out there. I think you can get a pair of muffs for right around $100."

Thunderbat's comments on Flowmaster Hushpower muffs
"I have to admit that I had my fears about putting this muffler on the car cuz I was afraid it would make it as quiet as the stock system...this is a chambered muffler but has a case only about 5 inches wide, or about as big as you catalytic converter only longer. Much to my pleasant surprise, when I cranked the engine the exhaust note seemed virtually the same as it did with the Cherry Bomb, a nice low rumble. Heavy throttle application still yields a robust roar but with little or no back-rapping when you back off or downshift...but most important of all, the interior drone is so low that its almost undetectable...turning on the stereo wipes it out completely. This is an expensive muffler ($124 from Jegs) but it is T409 stainless throughout and it hands down does the job. I would highly recommend this Flowmaster to anyone"

Rook on Flowmasters and the 3100
"Flowmasters don't come with tips and will run you $60+ each. From those that have played with them on a 3100, I hear they sound slightly deeper than the 3800s."

GTP4LIFE's comments on the SLP Loudmouth
"i have the original SLP Loudmouth and it is horbal, i mean it is really throaty i have had a few people ask if its a v8. but i can turn the radio up all the way and still hear it clear as day. theres no way to talk on the phone and drive"

vmschumacher's comments on the hushpower 2
"I have the flowmaster hushpower 2 muffler w/2.5 pipe and resonating silverline tips. Best sound I have EVER heard in a mildly modded GTP, EVER!!!!
My friends thought I had a v8 with the rumble."

1BAD97's comments
"A 3" downpipe without a cat will make your exhaust sound very nice with the stock mufflers/resonator. That can be had for less than $300 and is a bolt-on deal. I have stock cat-back (resonator in place) with 3" catless DP and PEM's, sounds pretty damn good to me (of course the XP cam plays a small part in that, lol) Not unreasonably loud, but mean enough to scare ricers, and it's very obvious the car is cammed. Just offering an alternative to throwing poopy sounding mufflers (which is ANY aftermarket muffler really) on a GP. The 3800 is just not a good sounding engine (as in, will never sound like a stang GT), nothing can fix that so don't go broke trying."

Quote:
Originally posted by lonezergling:

I run Pacesetter headers with a 3" cat'd downpipe into a custom resonator-less 2.5" stainless SE-style cat-back with one Flowmaster Super 40 and a big bore resonating tip.

My car is very loud. Not 454 Chevy with Zoomies loud, but WAY louder than stock.

I have terrible exhaust leaks from the headers but witht he XP cam, you can hear EVERY LOPE of the cam.

Without the resonator, there will be lots of in-car noise. Maybe not the brain rattling drone like many say but you WILL hear your exhausr plain as day inside the car.

Here's what I'm going to say you do.

If you want a good sound but DON'T want ti loud, I'd say get the usual 3" cat'd downpipe w/ u-bend delete from ZZP and maybe a P-log.

That will open up your exhaust a little bit, make it a little deeper but nothing much. That stuff is good for at least 10hp AND it gives your exhaust a better note. The cat-back won't give you anything and costs 2x as much.


From then on, if you want a better TONE out of the car, your best bet is to have an exhaust shop weld in 2 aftermarket mufflers in place of the stock ones. Flowmaster Super 40s and Magnaflows are the top ones around here. Grab a set of resonating tips in the style you want and you will have a nice deep exhaust.
Posted by: AustinGTP

Re: 97-03 FAQ, Perf mods, common fixes read first - 08/23/06 08:30 PM

Supporting mods for a 3.4" pulley:

CAI/FWI
U-bend delete
3" D/P
PCM
180* T-stat (drilled prefered)
1 heat range cooler plugs (copper core prefered)
A scanner is highly recommended in order to monitor the KR that will be introduced with the smaller pulley.

---------------------

RPM's at speed
Stock oem wheels and tire size.
Posted by: AustinGTP

Re: 97-03 FAQ, Perf mods, common fixes read first - 09/06/06 06:22 PM

The facts on a GT build:
(Posted by Chico)

I get a lot of PM's regarding building a GT so I thought I'd post here my opinions,first off as most know the common weak link in GT's & GTP's is the trans. and do'nt be fooled that the HD version is a whole lot better,now on with what I've found the 3.8 n/a can be built to run mid 13's with the following formula 1-cam either zzp gt1 or gt2 with a 3200stall convertor or Intense s/1 n/a cam ,it would also take a bump in compression to 10.5-1 by milling the heads 30k also a mild port job will help,as far as intake I would suggest a 3" FWI Iknow a lot will say 4" but remember on a n/a you will need air velocity not volume,now come to exhaust you will need a minimum of PEM's and 3" dp and hi-flow cat or race pipe if you can,another product that has potential is the zzp powerlog& rearported mnfld of course you may want to go to headers and I'm not saying not to it's just they are to expensive for the gain,of course you will need tuned pcm and most companies will tune for your mods,now a lot of guys just want to hang with stock GTP's at high 14's so aside from the head work and the cam (go with rocker's) you need the same mods ,I would suggest before modding that all your maintenace issues are resolved and your trans. is serviced and in good working order.
Posted by: HercMan(Rob)

Re: 97-03 FAQ, Perf mods, common fixes read first - 02/27/07 10:27 AM

CATALYTIC CONVERTERS

Cats or no cats that is the question.

Federal Law stipulates that any and all emissions controls that came on a vehicle must stay on a vehicle. Just because a certain jurisditction doesn't do emissions testing doesn't make it ok to remove the cat. Say your in a little podunk town and the local LEO is having a bad day and sees a car with super dark tint, loud exhaust and a burned out tailight and decides he's gonna harrass em. Car gets pulled over driver gives some attitude and next thing you know Mr. LEO is looking over the car with a fine tooth comb and what does he find? No cat on a car that's supposed to have a cat. That right there is a federal offence and is a big time fine.

Ok legalities aside

On a DD removing the cat doesn't gain enough hp to really feel a difference. On the track where every 100th of a second does it will. With the availability of aftermarket high flow cats compared to the cost of an OEM replacement if your cat is clogged and need a new one get the aftermarket. If your cat is fine the Ubend delete will be your biggest gain from the cat back. But if your gonna go that far many vendors now offer 3" Downpipes with cats already welded in for cheap.

If you have to ask catless or catted chances are you really don't need to run catless.

Only time I'll condone catless is one car is only running on the track and two your cat is clogged and your wallet won't allow a replacement on your only vehicle at this time. But in this case only as long as it takes to get the replacement not as a permanent fix.

As much as people hate cats they really do some good. The 70s gave cats a bad name but they have come a long ways since then.
Posted by: HercMan(Rob)

Re: 97-03 FAQ, Perf mods, common fixes read first - 03/31/07 01:41 PM

Top End Swap ie Mounting an M90 to a GT

the list of required parts. Alot of the parts can be had from Ed Morad at GTPED@msn.com or your local junkyard or all new from various vendors. Location and vendors the price will vary. Figuere about $1500 for the swap.

Taken from the last page-

This is a list of everything you will need
M90
L67 idler pulleys,
L67 idler stand off,
L67 throttle body,
L67 injectors,
custom PCM,
GTP balancer,
L67 MAP sensor,
L67 heads,
L67 fuel rail,
2 head gaskets,
head studs (or head bolts)
MAP adaptor harness,
bypass valve wiring,
vacuum lines,
brake booster line,
supercharger gasket,
throttle body gasket,
lower intake gasket,
lower intake Orings,
supercharger belt,
GTP valve covers,
GTP valve cover gaskets,
coil pack bracket for 99+ cars,
lower intake from an L67,
M90 bolts,
and new rocker bolts.

gas requirements are 93 octane? whatever the premium in your area is rated at

More info can be found here .
Posted by: AustinGTP

Re: 97-03 FAQ, Perf mods, common fixes read first - 04/08/07 06:43 PM

Posted by: HercMan(Rob)

Re: 97-03 FAQ, Perf mods, common fixes read first - 04/10/07 04:29 PM

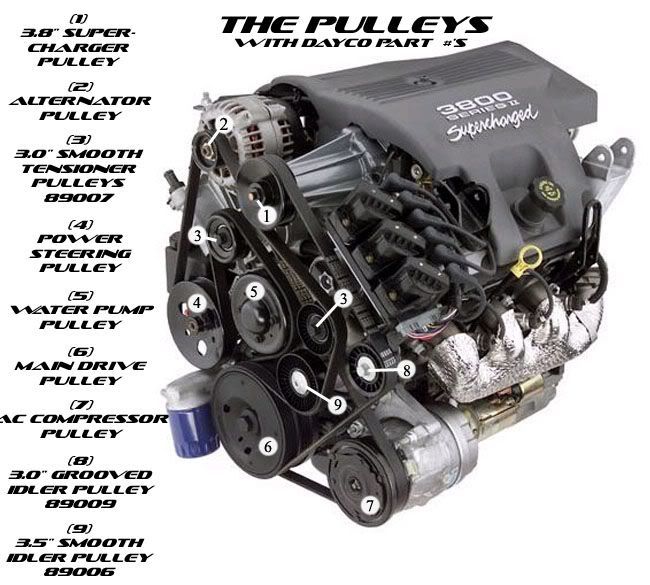
L67 - Series II Supercharged 3800
L26 - Series III Supercharged 3800

Gen 3 - Refers to M90 generation used on Series II motors. Slight design changes from older gens such as the ones on the 3.8 Tbird Supercoupes.

Gen 5 - Refers to M90 on Series III motors. The supercharger has a larger opening in the base, smaller silencer slits, and a different rotor coating. It's more efficient than the Gen 3 at making boost without heat, which is why so many people try to get one. They also don't generally need porting whereas Gen 3s do.

LG8 - 3100 motor.
Posted by: HercMan(Rob)

Re: 97-03 FAQ, Perf mods, common fixes read first - 04/26/07 05:44 PM

wheel lug spacing and offset

any wheel with 5x114.3 or 5x115 bolt pattern and 38-45 mm offset should work just fine for the 97-03 GPs.
Posted by: AustinGTP

Re: 97-03 FAQ, Perf mods, common fixes read first - 07/15/07 09:31 AM

Unlocking a factory deck:

1-800-537-5140

LISTEN TO OPTIONS

dealer code is - 02107#
OR
Call 1-800-537-5140 206010#

U'LL NEED THIS FROM THE RADIO

Press and hold 2 and 3 -----write down #
.
press AM/FM button.....write down the next three. Done and done!!

--------------------------------------------------

Make your own CAI:


Make your own TB Heatshield


--------------------------------------------------
Climate Control Diagnostic:
You must have a CJ2 unit (pictured below) to view this information. To enter diagnostics mode:
Press and hold both the Driver and Passenger knobs in simultaneously until the display changes to read "-00". To change position, turn the Driver knob to the desired number and turn the Passenger knob one click to view the data for that position.

Position Description US Observed on mine Canada
-00 Error codes (List of Trouble Codes Below!)
-01 (servo position) 103-107 43-162
-02 (servo position) 128 120-202
-03 (servo position) 150 162-194
-04 CJ2 Fan Speed Low=15, 29, 44, 58, 71, 86, 110=High, CJ2 Unit will adjust to other increments as needed
-05 (servo position) 93 88-191
-06 (servo position) -152 00-252
-07 (servo position) 00 0, 34-255
-08 (servo position) -155 00-255
-09 (servo position) 00 0, 23-255
-10 ? 04 04
-11 CJ2 Vent Mode 1=Def, 2=Bilevel, 3=Auto, 4=Lower, 5=Def+Lower
-12 Engine Coolant Temp -60 degrees 80=104, 95=131, 100=140 Peak@135°F
-13 Actual Vehicle Speed in MPH
-14 (servo position) 00 21=0
-15 ? 39 44
-16 Radiator low fan turn on temp -106 207
-17 Radiator low fan turn off temp 196 199
-18 ? 50 51
-19 (servo position) 162-169 40-172
-20 Affected by cabin temp sensor 89 50-172
-21 (servo position) 00 ?
-22 Sunload Sensor -117 LIGHT=126, 218=DARK
To return to normal operation, press the MODE button next to the Passenger temperature knob.

This is a list of the Trouble Codes displayed by the CJ2 Unit.
A two digit code indicates a current fault while a three digit code indicates a historic fault.
Trouble Code Description
00 No System Fault
01 or 101 Inside Air Temperature Sensor Short
02 or 102 Inside Air Temperature Sensor Open
03 or 103 Ambient Outside Temperature Sensor Short
04 or 104 Ambient Outside Temperature Sensor Open
05 or 105 LH Electric Actuator Open or Short
06 or 106 RH Electric Actuator Open or Short
07 or 107 UART Serial Data Line Fault
08 or 108 Solar Sensor Open
To clear codes from the CJ2 Unit, press the A/C Mode button.


--------------------------------------------------

HOW TO PROGRAM A FACTORY REMOTE:
IMPORTANT: Before entering programming mode, have in possession all of the transmitters you will be using on the vehicle. Once you program the transmitter, all previous codes will be erased from the memory. The other transmitters will not be functional until you program the transmitters again.

1. Remove the key from the ignition.
2. Close all of the doors.
3. Remove the “ MALL PGM” fuse from the fuse panel. Use the legend on the fuse panel or owner’s manual to properly locate the “ MALL PGM” fuse.
4. Insert the keys into the ignition, and turn to the ACC position.
5. Turn the key to OFF and then back to ACC within 1 second.
6. Open and close any vehicle door. A chime will be heard when the system enters the programming mode.
7. Press and hold the transmitter LOCK and UNLOCK buttons simultaneously for 14 seconds. IMPORTANT: After 7 seconds, a chime may be heard confirming successful synchronization. It is necessary to wait approximately 14 seconds for a second chime that will confirm successful programming.
8. Repeat the previous step on each additional transmitter to be programmed (including any existing remotes).
9. Remove the key from the ignition.
10. Install the “MALL PGM” fuse.

(just so everyone knows if you use a remote that was already used on another vehicle it will lock and unlock and pop the trunk on both vehicles)

REMOTE PROGRAMING FOR ANY CAR
www.programyourremote.com/

--------------------------------------------------


--------------------------------------------------
Posted by: HercMan(Rob)

Re: 97-03 FAQ, Perf mods, common fixes read first - 10/18/07 07:21 AM

SS M90

Quote:
Originally posted by D:
Ok well I'm bored and maybe Herc or Bobby can put this in the FAQ section, so its there for people to see.

SS M90 Build:
First off you need the ZZP Install Kit . Now with this if you have a 99 or newer car you will need the Alternator bracket, so you will have to pick that in the drop down menu. Now unless you have a Powrtuner or HP Tuner then you need to have ZZP do you programming. As far as the Option 3 if you want to start out with the 4.0" pulley then you will have to upgrade your injectors to GTP 36# injectors. If you have a 01 or newer GP then you will need the injector harnesses which you can also get from ZZP.

Now along with the ZZP install kit you will need 4 other things.

1. You will need a Machined Intake , the reason for this is b/c the injectors are at a different angle so ZZP custom makes there LIM to work with the injector angle of the L36. In this window you would need to select SS M90 for L36 converstion. Add the core charge and I also suggest you get the LIM gasket so you don't have to go searching for it later.

2. You will need the ZZP Billet Fuel Logs . The reason for these is b/c your old rails will not fit with the blower on the top of the engine. You can try and modify L67 fuel rails, but its a PITA, and unsafe is you dont do it right. So it may be expensive but easyer to by the rails. Just pick SS M90 in the drop down menu.

3. You will need a Ported M90 Supercharger , you need this blower b/c it is also custimized to fit on top of the LIM and adds cleance for the injectors. First pick your year then the core charge then pick SS M90, you dont need the Oil b/c it comes with the SS install kit.

4. You will need a ZZP Modular Pulley System , now if you are upgradeing the injectors then get the 4.0" if not then get the 4.2".

Now that is about it, but as a side note you will need Synthetic Oil after you are done and you have to do and oil change along with add some coolant.

Now for my option, I think you should add a few more things to the cost of the project either a Powrtuenr or HP tuner b/c you will need to scan and adjust fuel and timing to get the most power out of your set up or you can invest in someone to tune your car like a tuner shop, so you can also get the most out of the kit. Also I would spend the extra money and upgrade injectors and get the 4.0 pulley becuase you will regreat it after you are done and you only have the 4.2 pulley on, and for alittle more money you get alot more power.

With the Kit you should look to spend close to about $1500, if you can get the cores cheaper then you then it will safe you some moeny, If you add the upgraded injectors and a PT or HP tuner then you should look to spend close to $2100. But its all in what you want. This is basically just a guide for you guys I may have missed something that is why I would suggest before you order call ZZP or email ZZP and see what they have to say, but other then that this should be it.

Ray
Quote:
Originally posted by Chico:
I would add that 1.9 rockers and a plog and rear pem + a 3.8 pulley would be on my list of minimums.Chico(pops)
Posted by: HercMan(Rob)

Re: 97-03 FAQ, Perf mods, common fixes read first - 10/19/07 07:44 AM

Spark Plugs 101

Why autolite for GPers.
Posted by: HercMan(Rob)

Re: 97-03 FAQ, Perf mods, common fixes read first - 11/08/07 10:17 AM

How to contact Ed
Thanks for stepping in and providing my info. We are all moved in and functioning. Amazing what we accomplished in the last place, cant wait to see how we flourish in the new space 15 times larger overall.

lots of ways to get ahole of us.


email sales@MoradPartsCompany.com

address:

Morad Parts Company
3455 W. 140th (service road)
Cleveland, Ohio 44111
p-216-671-3736
f-216-671-8406

M-F 9AM-6:30PM

website:
www.MoradPartsCompany.com


_____________________________


11.084@125.01 97GTP 10.711@125.71 BADSSEI
04.5'Dodge diesel/05'GTP/07'Vette
GTPED@msn.com parts requests
EBAY
Posted by: HercMan(Rob)

Re: 97-03 FAQ, Perf mods, common fixes read first - 11/19/07 07:38 PM

FUEL PRESSURE

Quote:
Originally posted by Blackarrow98gp:
Fuel pressure should be 48-55 psi at the fuel rail, with the key on and the pump running.
Quote:
Originally posted by Blackarrow98gp:
Yep, fuel pressure spec is from the '98 GM Service Manuals, and applies to S/C 3800 fuel systems. Fuel pressure spec for NA 3800 is 41-47 psi. If the fuel system drops more than 5 psi in 10 minutes, check for leaks in one or more of the following areas: Fuel pump check valve, flex pipe (part of pump assembly), valve or valve seat in the fuel pressure regulator, fuel injector(s). Inspect the fuel lines for leaks or obstructions as well.
When checking fuel pressure, bear in mind that the pump only runs for about 2 seconds with the key on. It may be necessary to cycle the ignition off for 10 seconds, then back on to get an accurate reading at the gauge.

Posted by: AustinGTP

Re: 97-03 FAQ, Perf mods, common fixes read first - 12/27/07 04:02 PM

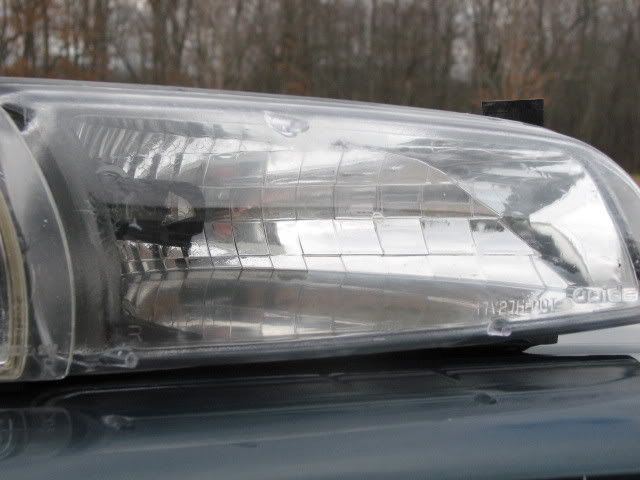
Headlight restoration:

Quote:
Originally posted by spillway47:
As promised, here is the write up and the before and after pictures of my passenger's side headlight, using the Permatex Headlight Restoration Kit to try to undo the crazing at the top of the lens.

Some preliminary info: First, since it was still cold and threatening rain, I just removed the headlight and brought it inside. Second, I followed the manufacturer's directions to the letter.

Permatex gives you four 1/8 sheets of wet/dry sandpaper going from 1000, to 1500, to 2000, and a very fine 2500 to end up with. The container it all comes in serves as a water container where you soak each sheet for 10 minutes before use.

You also get 2 exam gloves, a small piece of soft cloth, and a small bottle of polishing liquid to complete the job.

Since I was dealing primarily with crazing, and no real cracks to speak of, per the instructions I didn't begin with the 1000 grit, I started with the 1500. They recommend you go back and forth with one grit, then up and down with the next one, and so on, which I did. This worked out well since I was going back and forth (side to side) first and last, and only up and down once. It's much easier to go side to side than it is up and down with you've got the headlight out of the car.

They recommend you change the water you're using between each grit, too, which seemed like a good idea to me. As I said, I followed their instructions entirely.

After the sanding was complete, the headlight looked cloudy on the outside, but felt smooth to the touch.

Next comes the polishing, for which they give you about 1 oz. of polishing liquid and a small soft cloth. This will work up a sweat. You really have to get after it, with lots of elbow grease, to get all the ultra-fine sandpaper scratches out of the plastic. I used up almost the entire 1 oz. bottle before I finally got the lens clear and shiny.

Last but not least, I rinsed the lens off with warm running water, and buffed it to a high shine with a microfiber towel.

My conclusions are after the before and after pics.


---


My conclusions:

The results (to me) were impressive. My biggest concern was that I wasn't getting enough light through the lens to properly light up the road on my way home every night at midnight, and last night I noticed a huge difference, especially with the brights on.

So all in all, the product worked as advertised, the instructions were clear and easy to understand, and the materials enclosed were top quality.

Having said that, it seems to me that $15.99 is an awful lot of money to spend on four 1/8 sheets of sandpaper, some polishing liquid, and a soft cloth. They also enclose 2 rubber exam gloves, which may be why it's so expensive.

If I had to do it over I'd just buy some similar grit wet/dry sandpaper and use some Turtle Wax polishing compound. There is a link floating around with just those very instructions, and I could've saved maybe $6-$7 by going that route. But if you don't have the time to hunt down the materials, this Permatex kit should do the job.

James.
Posted by: AustinGTP

Re: 97-03 FAQ, Perf mods, common fixes read first - 02/13/08 06:45 PM

Misc electrical mods
Posted by: HercMan(Rob)

Re: 97-03 FAQ, Perf mods, common fixes read first - 03/15/08 04:54 PM

How to remove steering column cover

Quote:
Originally posted by D Richard:
Found this and it works on how it is removed.
Looks like it is the switch, I took it all apart and the brake lights work and signal but not the 4 ways. The switch will not stay down, so I need to replace it. I will go to the dealer next week.
Thanks for all the help
Dave
Step 1:
First you'll need to remove the bottom steering column cover. Use the appropriate sized male torx bit on the middle back screw and also remove the 2 other screws on each side. The cover has plastic loops where it attaches to the dash so you must move it towards the dash and then down to release it.

Step 2:
Now its time to remove the top steering column cover. First you'll need to remove the tilt steering lever though. Using a flashlight, look into where the lever attaches to the steering column. You will see a metal tab that you can push on to release the tilt lever and pull it out. Now you can take off the top steering column cover. Looking up from underneath you will see 2 male torx screws holding it on. One on each side of the steering wheel. You can use either needle nose pliers to remove these if you don't have female torx screw bits. Once these are removed, use a pair of tin snips to cut the plastic just below the key lock or you won't be able to get the cover up and around the key lock. Now carefully spread that part of the cover up and around the key lock while pushing back towards the dash with the cover. It should release and come off.
Posted by: HercMan(Rob)

Re: 97-03 FAQ, Perf mods, common fixes read first - 04/07/08 07:36 PM

Rear facia Pontiac taillight

http://www.mkiii.org/gp/wiringpontiac.html
Posted by: HercMan(Rob)

Re: 97-03 FAQ, Perf mods, common fixes read first - 04/10/08 05:45 PM

DIY foglight covers

DIY Driving Light Covers
By AustinGTP from Grandprix.net
You'll need the following:
1) 12"x12" gray tinted plexiglass (this will allow for extra just incase. Should be enought for 2 complete sets.)
2) Plastic Weld brand adhesive
3) 13oz plastic Folgers coffee can
4) Dremel tool (or some other similar device)
5) 6 misc cans
6) Marker

Step 1:
Start with the 13oz coffee can, marker, plexiglass, and Dremel.
Trace the coffee can on the plexiglas, holding the marker straight up. Do both sides.
Using the small cutting wheel for the Dremel, start cutting around the trace marks. Get as close as you can to the line, but do not touch it. Once you get both side cut out, mark the fingers on what's left of the sheet. You'll neeed six at 3 3/4"x1".
Now you'll need the following - Dremel with the drum sander, fingers, lens. Smooth out the edges of all the fingers, both sides (this step is optional. I prefer to not have any edges on mine).
Carefully, lightly, and slowly go around the edges of the lens with the drum sander. Sand it all the way to the line on both lens'.

Step 2:
You'll need the Plastic Weld, 6 fingers, 2 lens', and 6 misc cans.
Peel the paper off of one side of the lens' and orient the six cans around the lens, where you want the fingers to be.
Mix the Plastic Weld as per directions. Using a toothpick place a small amount of Plastic Weld on the end of the fingers and place them right on the edge of the lens. use the misc cans to prop up the fingers. Get all six finger set on both lens and let it set. Make sure that the fingers are leaning out just a hair. After setting for about 30minutes or so, check the finger. Touch the very end of the finger and see if you can wiggle it any, or if there is any resistance. If your getting resistance it should be set enough for a second application of Plastic eld. mix up some more and using a tooth pick put Plastic Weld on the out side and inside of the base of all the finger, so it will ensure a good, secure adhesion.
After the second application let them set over night. Do not get in a hurry and put them on your car just yet. If you do, the fingers will no longer have that slight outward lean, and the lean is important for a secure fit.
The next day, peel the paper off and place them in the fog light buckets. One of the fingers must be in the top position. Give them a frim push when sliding them in the bucket. The fingers should be secure enough to not break off. I tried to break a set off a cracked lens and the finger broke before the Plastic Weld. This is some strong stuff.
Posted by: HercMan(Rob)

Re: 97-03 FAQ, Perf mods, common fixes read first - 05/24/08 09:36 AM

Information for the 4T65E and HD

http://www.tripleedgeperformance.com/4T65E_Transmission_Info.php
Posted by: HercMan(Rob)

Re: 97-03 FAQ, Perf mods, common fixes read first - 08/26/08 04:03 PM

Most people have a problem with installing a TB spacer and the coolant blowing out the gasket on the side of the supercharger. Here is a mod that we've done to a few cars in the last couple of years with no ill effects. Yes you can plug the passages at the LIM, but this is for those that are simply installing a TB spacer. If anyone has any pictures that I can use to add to the write up it would be appreciated. I only have a pic of the finished project.

Preface:
Make sure the engine is cool before starting this project.

Items needed:
Other than the items provided with a spacer.
2 - 1/8" NPT flush mount plugs(hard to find, check Ace or True Value Hardware)
Thread sealant
TB gasket(unless installing a spacer you should have received 2 gaskets)

Tools:
10mm deep well socket
Hex key(allen wrench) that fits brass plugs.
RTV sealant(recommended)if you want to back up the gasket.
Cutting oil for the tap. Since it's aluminum and you're using a hand tool you can probably get away with motor oil.

1. Remove the TB by disconnecting all the electrical connections and the throttle linkage. the throttle linkage is just a couple of quick connectors and figuring out how they work can be a challenge. Next there are 3 mounting nuts that need to come off 10mm I believe. Be prepared to lose about a cup of coolant. Viola, the removal is done.

2. If you are installing a TB spacer follow the instruction on removing the OEM studs from the SC. If you are not installing a spacer go to step 3.

3. There are 2 ports on the supercharger at the bottom of the mating surface between the SC an TB. They are the perfect size to accept a 1/8" NPT tap without drilling. Run the tap about 1/2 way into both of those ports.

4. Scrape all the old gasket off of the mating surface and use a shop vac to suck up the aluminum shavings and gasket material. Make sure you suck out the coolant ports nice and clean.

5. Put some thread sealant on the 1/8" flush mount brass plugs and install into the newly tapped holes with the appropriately sized hex key wrench.


6. If you are installing a TB Spacer continue on with their instructions. If you aren't installing a spacer, clean the TB of old gasket material, install new gasket and reinstall TB. 89lbs/in is the spec. for the 3 nuts. Make all electrical connections and don't forget the throttle linkage.

7. Inspect all connections and start the car. Ispect for leaks and top off your coolant.
Posted by: HercMan(Rob)

Re: 97-03 FAQ, Perf mods, common fixes read first - 11/22/08 05:15 PM

disable headlight flash for use with HIDs/Projectors

If your car has a BCM Type 4 (Look for RPO code UA6 on the Service Parts Identification decal under the trunk lid) here's how to do it:


How to program:
1 Turn off the IP dimmer switch
2 Turn ignition switch to OFF position
3 Remove MALL PGM fuse
4 Turn ignition switch to ACC position
The BCM sounds the chime a number of times equal to the BCM installed in vehicle (1-4 times) Make sure BCM is Type 3 or 4.
Now the BCM has entered the feature customization mode.

5 To change the remote unlock control mode, press and release the unlock button on the transmitter.
The BCM will sound the chime equal to the remote unlock control mode. A transition past Mode 2 repeats the sequence starting with Mode 1.

Remote Unlock Control Modes
Mode 1 (disabled) All doors unlock when pressing unlock on transmitter
Mode 2 Driver's door unlocks when pressing unlock once on transmitter, press unlock again within five seconds unlocks all doors

6 To change remote activation verification mode, press and release the lock button on transmitter. The BCM will sound the chime equal to the remote activation verification mode it is in. A transition past Mode 4 repeats sequence with Mode 1.

Remote Activation Verification Modes
Mode 1 Feature disabled
Mode 2 Headlamps flash when pressing unlock or lock on transmitter.
Mode 3 Headlamps flash when pressing unlock on the transmitter. Headlamps flash and horn sounds when pressing lock on the transmitter.
Mode 4 Headlamps flash when pressing unlock on transmitter. Headlamps flash when pressing lock once on transmitter; within five seconds, headlamps flash and horn sounds when pressing lock again on transmitter.

To exit and save: Turn ignition switch to OFF, Reinstall MALL PGM fuse
Posted by: HercMan(Rob)

Re: 97-03 FAQ, Perf mods, common fixes read first - 12/18/08 06:57 AM

INSTALLING HIDS

Quote:
Originally posted by r.s.hutchinson:
[b]Installing HID's - Single Beam and Bi Xenon

What the kit comes with:

Single Beam 9007's

2 ballasts + mounting material
2 bulbs
All required wiring harnesses


Bi Xenon 9007's

2 ballasts + mounting material
2 telescoping bulbs
All required wiring harnesses + relay


Before you start:

It is highly recommended that you disable your DRL's and your security flash before installing your HID's. It is not good to flash HID's as it strains your ballasts and can cause them to fail prematurely and will also diminish the life of your bulbs. Also, DRL's will not provide the HID's with sufficient energy and the HID bulbs will constantly flicker. This is obviously not good for the bulbs and can become highly annoying. Lastly, do not turn on HID's without the car running.

Disabling Security headlight flash

1) Pull the "MALL PGM" fuse in the glove box
2) Turn your key to accessory
3) Hit the lock button on your key-fob until there is only 1 chime.
4) Put the key back to off
5) Plug the fuse in.

Disabling DRL's in 97-98 Models

You need to pull the DRL fuse behind the glovebox. Fuse number (coming soon)

Disabling DRL's in 99-03 Models

coming soon.


What you need to do:


Mounting the ballasts:

Their are many different ways and locations where you can mount the ballasts. I recommend screwing them to your bumper for multiple reasons. Also, you don't need to remove the bumper cover to do this. You can remove the black shroud in between the bumper cover and rad support, this should give you more than enough room to get a drill in there. Start off by removing the headlights and shroud so you have some room to move your hands around. Then position the ballasts however you like but because the wires are only so long, the closer to the headlight the better. Use some self tapping screws and mount the ballast bracket to the bumper. Now take the ballast and slide it into the bracket. Make sure it is snug in the bracket, you don't want this to slide out when turning. This will have to be repeated for the other ballast on the other side.
Another alternative is to use two sided tape to mount the ballasts, this is less time consuming but also less secure.


Wiring:

Single Beam Bulbs

Check your headlight sockets that came with the kit. All too often it will be wired incorrectly, most likely for a 9004 bulb. The socket for a single beam 9007, if wired correctly, should go 'empty, ground, low beam' and should look like this:


If it does not look like this, then you must remove the pins from the socket using a metal pick and re wire accordingly.

The other end of this wiring harness connects directly into your ballast.


Bi Xenon Bulbs

The included wiring harness probobly only has 1 headlight socket. It does not matter whether it connects to the driver or passenger side. The headlight socket here should look very similar to the single beam sockets like pictured above, except it will have a pin in the hi beam spot as well as the ground and low beam pins. This harness will also have 1 power and 2 ground wires; one for each side. These 3 wires will come with crimped on eyelets. The power eyelet I bolted directly to the top of the fuse box under the hood. As for ground, make sure you grind away ALL PAINT, you must have bare metal to get a good ground. You can bolt it to your bumper or to the rad support behind the headlight, whichever you find easiest. After you have grounded them, throw some paint over it and all bare metal so that it does not rust. Also on this harness will be 2 hi-lo trigger wires, 1 for passenger and 1 for driver side lights. These connect directly to the trigger wire on the bulb end. The last 2 plug ends connect directly into the ballasts themselves.


Bulbs: *DO NOT TOUCH THE BULB GLASS!!*
Oils from your finger will diminish it's life. Only handle it by the plastic base.

Single Beam Bulbs

This is very straight forward. The bulb goes into the headlight capsule just like stock and has two plug connections on the end. These two ends connect directly into the corresponding plug ends coming out of the ballast.

Bi Xenon Bulbs

Again, the bulb goes in just like stock however these bulbs will have a hi-lo trigger wire in addition to the 2 plug ends. The 2 plug ends connect to the plug ends on the ballast. The hi-lo trigger end connects to the hi-lo trigger wire on the wiring harness.


That's it - Everything should be connected and working. Keep the bulbs on for atleast 10 minutes for the initial start up.

I will add pictures and diagrams as I take/draw them so that you can also see how everything is connected.

Thanks to 01GTShaner for the pics. [/b]
Posted by: HercMan(Rob)

Re: 97-03 FAQ, Perf mods, common fixes read first - 01/06/09 08:08 AM

HUD INSTALL for those without the HUD option

this is not my work, but is what I used to do the connector splicing. When I first printed the cheat sheet off, it printed it missing the connector wire location (ex. A7), the connectors all have small markings on them, as well as a corresponding letter, and if necessary connector color.

the image is too large to post it in the reply.

http://img49.imageshack.us/img49/3289/dicfeb2007yn1.jpg

and this is a compilation of photo's I used for the install, again not my work.

http://img216.imageshack.us/img216/8365/hudimagell4.jpg

Drivers Information Center Swap, from non-digital to digital. (not my work)

http://img368.imageshack.us/img368/4954/dicfeb2007pj5.jpg

Here are a few of the connector views, courteous of me. ( For a larger view, save to your computer and open in a Paint program, or image viewer.

HUD Switch:


HUD module:


Trip Calculator (DIC)(1 of 2)


Trip Calculator (DIC) (2 of 2)


Drivers info Center (NON-Digital)


Instrument Cluster Connector (C1)


Instrument Cluster Connector (C2)


hope this helps you guys planning either or both swaps (I did both swaps, both requiring complete splicing each time).

--------------------


1999 GT Mods so far: Ignition switch relay (switch saver). Fuel pump rewire. Alternator mod (wire from alt to positive battery connection by battery) De-badged. Spoiler Fix (rubber washers in between spoiler and trunk lid). F-body brakes, Ipod aux input. 17" silver bullits. GMPP suspension kit. 3" DP, Digital DIC swap. HUD installed. To be continued...
Posted by: HercMan(Rob)

Re: 97-03 FAQ, Perf mods, common fixes read first - 01/12/09 08:24 PM

Quote:
Originally posted by 20gtp02:


667= 67.250"
660= 66.750"
653= 65.875"
650= 65.500"

667 size for stock.

No IC
Grand Prix
3.8 (Stock): 667
3.2-3.6: 660
2.85-3.1: 650
2.7-2.85: 642

Bonneville
Stock: 721
3.4: 716


With ZZP Stage 2 IC (2.25” tall Core)
6 Rib
3.3-3.8: 685
2.7-3.2: 680 (Note that the NAPA 680 may be too long for 2.8" and smaller. Try a NAPA 672)
2.5-2.6: 672

8 Rib NOTE: For these belts the part numbers are 080 rather than 060...or K8 with the Duralast rather than K6.
3.0-3.2: 685
2.6-2.9: 680

Gen 5 Blower
2.9-3.1: 685
2.7-3.0: 680
2.4-2.6: 675


With ZZP Stage 3 IC (2.375" Core)
6 Rib:
3.1-3.8: 685
2.6-3.0: 680

Gen 5 Blower
3.0-3.8: 685
2.6-2.9: 680
2.3-2.55: 675


With ZZP SSIC (1” tall Core)
3.2-3.8: 670
3.9-3.1: 667 (Stock belt)
2.8: 660


With MAP IC (2.0” tall Core)
3.1-3.4: 680
2.8-3.0: 672


ZZP SS M90 Conversion
970 - SS M90 for 97/98
950 - 3.8-4.2 SS M90 for 99+
947 - 3.5-4.0 SS M90 for 99+

Other Belts

060915 - Stock accessory belt for 99+
-also works with either UD WP pulley or OD alt pulley but not both.

060923 - Accessory belt for 99+ with UD WP pulley and alt UD pulley.

4060935 - Stock accessory belt for 97/98 (94").

4060938 - Accessory belt for 97/98 with underdrive pulleys.
Posted by: HercMan(Rob)

Re: 97-03 FAQ, Perf mods, common fixes read first - 02/11/09 02:36 PM

Online repair manuals for various vehicles


Quote:
Originally posted by Drakhan:
I thought this would be useful to someone...

At this page

Enter the generic library card number:
[b]123456789


Select:
Public library of Cincinatti and Hamilton counties

Sroll down and select:
Auto repair and reference center [/b]
Posted by: HercMan(Rob)

Re: 97-03 FAQ, Perf mods, common fixes read first - 05/19/09 12:21 PM

Key stuck?

Quote:
Originally posted by SlickGTP:
For all those that are having problems removing the key after parking the car.


Ignition Shift Lock Diagnostic and Repair:

Required Tools/Supplies:

3/8" Ratchet
12" and 6" extensions for the ratchet.
10mm or 13mm Sockets(can't remember what size is needed)
Small and medium sized flat bladed screwdrivers
Emery boards or fine sand paper
Some Elbow grease
Dielectric grease
2 - Bolts with nuts
1 - Bolt with nut
Wrenches that fit the above bolts
Dremel or similar device with a grinding/cutoff wheel
Lotsa Patience


_________________________________________________________________________________________________________

Diagnostics:

Remove the Center Console tray and place out of the way. You will also want to empty the cubby at the front of the console. To remove the Center Console lid, open the cup holder, set the parking brake, place the shifter in D/3, and pry up from the back to the front. If this is the first time this has been done on your car it will be a little difficult. There are about four sets of clips on both sides of the lid. Take your time and it should come off intact, just move slowly. When all the clips have been disengaged, slide the lid up and rearward off the center console. Place it out of the way somewhere.

Next remove the Shift Knob, Boot, and Shift Indicator plate. To do this you will need to take out the clip that holds the knob onto the shifter. It's located towards the bottom front of the knob. I found that a small screwdriver worked best to pry it forward and out. After the clip has been removed, all three pieces can be removed as one.

Remove the wire harness plug from the front of the Shifter. While listening to the steering column, carefully jump the pink and purple/white wires in the plug to see if the solenoid in the column activates.

[img]http://www.unknownbrewer.com/gallery2/ma..._serialNumber=2[/img]

There should be a click when the wires are jumped. If the solenoid activates then the issue probably lies in the module that the plug goes into. Otherwise, the issue is either in the wiring harness or the lock cylinder.

WARNING: If you jump the wrong wires, you will most likely blow the BTSI fuse. I've done it and hence the my warning.

_________________________________________________________________________________________________________

To remove the module, you will need to remove the Shifter Assembly. First disconnect the Transmission selector from the Shifter Assembly. The rod pops off of the Shifter with a little side pressure and then there is a little clip that holds it to the front of the Assembly. Next remove the wiring harness clips from base and unbolt the Assembly from the floor of the car.

[img]http://www.unknownbrewer.com/gallery2/ma..._serialNumber=2[/img]
[img]http://www.unknownbrewer.com/gallery2/ma..._serialNumber=2[/img]

After the bolts have been removed, the Shifter can be removed from the car and taken somewhere where you can perform surgery. xD

First grind off the rivet that holds the Shifter to the base of the assembly. Once the rivet has been removed, take the shifter off of the base.

Now, pop off the little circular disc and remove the little plastic lever from the module. Grind the two rivets that hold the module to the Shifter. Remove the rivets and slide the module off of the shifter taking care not to lose the spacer disc that sits between them as well as the funky cylindrical piece that fits into the module and just happens to be spring loaded.

Alrighty, at this point you should have a little black box that fits in the palm of your hand. There are four clips that hold it together. Carefully disengage each of the clips and pull the lid off of the module. I've found a small screwdriver to be handy here. With the lid off of the module, you should see a circuit board with a few different things on it. You're primarily interested in the long brass looking switch that rests on a contact and the end of a nylon rod.

Take a fine emery board or sand paper and lightly sand the contacts on the switch. After sanding them, place a small amount of dielectric grease on the contacts and reassemble the module.

At this point everything should be the reverse of what's been done up to now. The only exception is that you will need to replace the rivets with bolts. The one suggestion I have is when you bolt things back together on the assembly, place a drop of loktite on bolts. I didn't do this and one of the bolts fell out after the nut had come loose. For the few days that it was like this, it felt like I had a manual in my car, but that's besides the point. crazy

_____________________________________________________

I'll be adding pics of the actual module tonight, but I figured I should at least get this out for y'all to look over. Holler at me if you have questions and I'll help wherever I can.

-- John

Edit: looks like I need to fix those pictures too.. Sorry for the blurry text. =\