Upgrading to
Baer Brakes
Tools
you will need:
- Jack
- Jack
stands
- Hammer or
rubber mallet
- Socket
wrench
- Sockets
(10mm, 12mm, 13mm, 14mm, 15mm, and 19mm)
- Box
wrenches (10mm and 13mm)
- Torque
wrench
- #30 Torx
driver
Installing
the Front System
Before
starting, fit the brake assembly in one of the removed wheels to
insure there will be no clearance problems
- Remove
the stock brake components (pads, rotors, calipers,
hoses, etc.) using a 15mm socket wrench and 12mm line
wrench
- FOR SPORT
SYSTEMS ONLY: modify spindle by grinding about 1/8"
with a metal file.
- Install
the new bracket to the backside of the spindle and attach
with 14mm bolts, washers and nuts
- Insert
bracket from behind with spacers pointing outboard
- Insert
bolt from behind (without the washer)
- Put
the washer against the aluminum upright and install
nut
- Torque
to 110 ft. lb.
- Place
rotor over hub seat and secure with two lug nuts
- Install
caliper with bleeder pointing up
- Using
12mm bolts, secure and torque to 85 ft. lb.
- Install
brake hose
- Watch
hose throughout suspension movement to ensure it does
not contact suspension, spring, strut, etc.
- Keep
hose clocked toward inner fender wall
- Once
finished installing, perform a final check on both rotors
for clearance from all obstructions and for being
properly centered between the calipers and brake pads.
You may find that the ABS sensor's bracket is touching
one or both rotors and in this case, bend the bracket
slightly back (1/8" or 3/16" should be enough).
If other obstructions are present or if the rotors don't
center properly between the pads, re-check all previous
steps and correct any problems. Do not proceed until all
concerns have been addressed.
Proceed to Installing
the Rear System, or, if done, proceed to Bleeding the
System.
Installing
the Rear System
- Remove
the rear brakes, hubs, and parking brake mechanisms. You
will need a 13mm wrench, 10mm socket, and #30 Torx driver
- Using
original bolts, install the new bracket and hub
- Caliper
should be clocked to the rear of the car and up
- One
bolt is shorter than the other - this one goes to the
bottom and front of the hub so as to not run into the
control arm
- Torque
to 40 ft. lb.
- Install
rotor and secure with two lug nuts
- Install
caliper behind the axle with 12mm bolts, washers, and
nuts using a 19mm socket
- Install
brake hose
- Install
at caliper end first and loosely secure with banjo
bolts - hose should point to the outside of the car
and then curve up over the upright
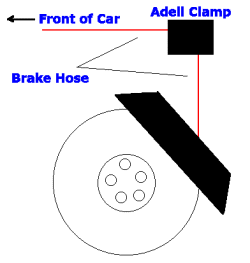
- Use
Adell (cushion) clamp to secure the hose to the upper
caliper mount
- Clamp goes
on inside of bracket
- Hose should
run up to the clamp, then run horizontally as
in the figure below
- Attach
hose to flare bracket and hard line
- Tighten
clamp and banjo bolt making sure hose will not rub on
anything
- Reinstall
factory parking brake cables
- Proceed
to Bleeding the System
Bleeding
the System
Seasoning
the Rotors
Bedding
the Pads