
Begin
Well, I received the replacement exhaust tips that I've been waiting for! I went to SLP's website and the have take off dual stainless T304 tips from 1997 Firebird/Trans Am's. Really nice quality! $15 Per set and $6 shipping! Not too bad for $21, considering I checked with a local parts supplier, and the replacement tips from Walker (#42471) were a whopping $154!
Expect this upgrade to take around 20 to 30 minutes.
Tools Required:
- Heat Valve Lubricant/Penetrating Oil
- Propane Torch or Mapp Gas Torch (Possible...Very Possible, if you're car isn't new)
- Hacksaw/Sawzall with metal cutting blade
- 15mm Socket Wrench/Ratchet/Short Extension
- 9/16" Socket Wrench
- Level
- Tape Measure
Parts Required
- (2) 2 - 1/4" exhaust clamps ($2.25 w/tax, for both)
- (2) Pieces of 2" EMT Conduit (good luck getting a short piece, check with a local electrician or a electrical supply house / hardware store possibly?) Probably about $2 or less, they might even be able to cut it for you if you ask nicely!
- Exhaust Tips (I got mine from SLP Engineering)
The Upgrade
Ok. Start by spraying the collar of the original aluminum tip and the tailpipe clamp bolt with some penetrating oil of some type. I used GM/Goodwrench Heat Valve Lubricant. When that's done, start by cutting the clamp that's welded to the muffler(a round doughnut shaped muffler clamp) free from the muffler. It's a small bracket about 1" long. Then, loosen the 15mm nut that clamps the clamp. Take a large pair of pliers and squeeze the clamp, and slide it toward you onto the exhaust tip. Then, move the tailpipe up, down, left, right, in, out, etc. until the ugly SOB comes out. Budget at least 10 minutes of frustration on the first one, about 5 mins once you "get the hang of it" for the second.
Start out by obtaining some 2" EMT Electrical conduit. This was easy for me, since I'm an electrician. Some actual exhaust tubing from a auto parts store should work too, but Iąm not certain about the size. It's got to slip into the muffler outlet snugly. Cut 2 pieces 4-1/2" long, perfectly square! This is very important, if you get them off by cutting them without a mitre box or a chop saw, they will not stay in straight! They will cant to the angle you cut! Once you've cut the conduit (I suggest you use conduit, it's just smaller than standard 2-1/4" exhaust tubing, and it makes things go in much easier!) Take one of the new exhaust tips, put the conduit into it, all the way, and take a black marker and run around the tip to tell you how deep to go into the muffler. It should be exactly halfway, 2-1/4". Go back to the muffler, put the removed round exhaust clamp onto the muffler, push it all the way back to the muffler, and take a small ball peen hammer and open the throat of the muffler a small bit, checking the fit of the conduit as you go. Once it goes in nicely, place a block of wood onto the pipe and hammer it back into the muffler 2-1/4". Now, you're new tip should go onto it easily, and it will be perfectly aligned to fit. Tighten the round clamp onto the muffler, take a new 2-1/4" exhaust clamp and (your choice, up or down, down shows the clamp much more) clamp the exhaust tip onto the conduit. Level the tip by eye, whatever you like and are happy with (I've moved mine 3 times to get the "perfect fit". By the way, the muffler clamp uses a 9/16" socket.
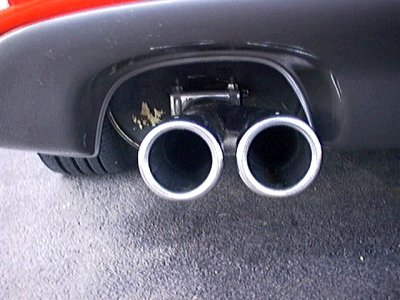
Once you've gotten them both in place, step back and admire you're work... Yes, I know they're not level! Go back and do it again! The only thing I wasn't satisfied with is the height of one of the mufflers is 3/4" lower than the other. Picky, Picky, Picky. Boy, I'm definitely anal. I suppose I'll be happier when I get that "expensive" Borla system when itąs available. But, for about $25 you canąt go wrong! It looks so nice!