Modifying your intake to a K&N cone-style filter
The Jamie Dresser
Method
Another
method, probably easier to implement, by Jamie Dresser.
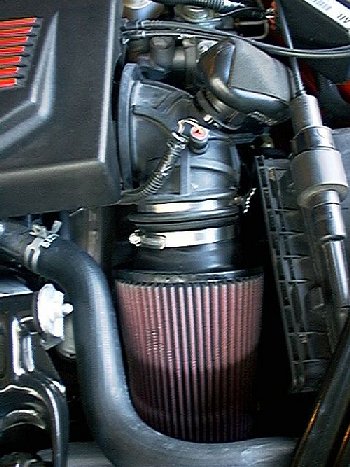
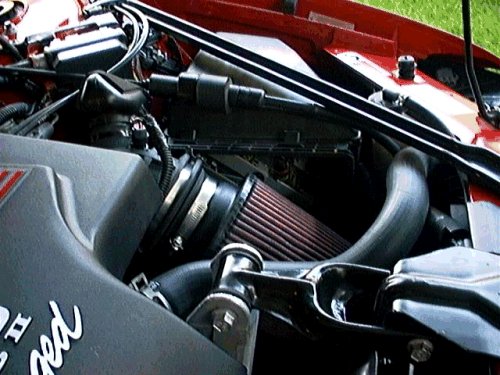
Pictures of the final installation:
NOTE: I have been told by a list member that K&N states that this type of kit is not emissions legal in the state of California. Please use this information only if you understand this.
Here
are the parts you will need: Time
Required: 30-45 Minutes (or less) The
Upgrade (Optional: You
don't need to remove the crossmember from the car, but it makes
things A LOT easier if you do. You need a 3/8" ratchet,
short extension and a 15mm socket to remove the 3 bolts holding
it on). Start by removing the original air intake hose.
Easy, just unscrew the
little butterfly clamp off the air box, pull a bit and it'll come free.
Then, remove the quick disconnect fitting on the IAT. Take the intake
hose and remove it from the throttle body, takes a bit of pressure to get
it to unhook. Once you have it off and out of the way,
unsnap the breather box clamp
that holds in the air filter. Take it off and remove the filter, you
won't need them any more (until you need to return the car to stock, at
least). Take the original air hose and
with a sharp knife, cut the hose in half,
leaving 2 ribs intact. You want to leave 2 ribs so that the existing
butterfly hose clamp can be re-used to hold the hose to the... 3" EMT! Conduit.
Or, you can use ABS Plastic pipe. This is up to you. I
used electrical EMT conduit, you make the call, after all, itąs your car.
You need to procure a piece of 3" EMT conduit. Cut the 3" EMT exactly
3" long, insert the 3" into the K&N cone filter (I used the large one,
the 4x9) and clamp it down tightly. This size is a perfect fit, I know
that it sounds weird using 3" to fit into a 4" cone filter, the OD is
correct though. Take the old butterfly clamp and cut
the little rubber keeper off the
bottom. Unscrew the clamp totally. Place it onto the intake hose (what's
left of it) and struggle mightily to get it into the groove. Make sure
that the nice little butterfly clamp part lines up with the flattened
area of the intake hose (the part closest to the PCM box), it will make
things easier to tighten. Do not overtighten this! The rubber can tear
or weaken enough to tear over time. If you are worried about it, you
could use some black RTV silicone on it, and seal the conduit into the
area like I did. Works great, and thereąs no chance of it loosening up.
Also, some hi-temperature tape can cover the hose clamps so that it looks
"cleaner", this is up to you. Take a dab of engine oil(yes, the amount
that's on the dipstick will work
fine, thank you!) and put it on the inside of the intake hose where it
connects to the throttle body. It will aid in the insertion/removal.
Place the intake hose back onto the throttle body. Take the K&N filter
and force fit it into the nice tight area that's left for it. Don't
wrinkle the filter (or bend, spindle, mutilate, etc.) if you can help it.
It may help to be doing this while the car is cool since you're working
in such close proximity to the upper radiator hose, right? Once you've
gotten it into the tight area, it's pretty simple to get it to slide
together. Clamp it down tight, making sure that you have a good fit
between the filter and hose. If you cut straight like I hope you did, it
will look really nice. If not, perhaps some good electricians tape would
work to cover the mess, so to speak. You can do the entire conversion
outside of the car, and just fit it in after youąre done, but the first
time you do this you might want to "visualize" it before you really do it. Replace the
IAT sensor wires. Reinstall the crossmember, if you optionally
chose to remove it. Start the car.
It still has that sweet metallic zing to it, but those little
mushrooms on the hose definitely aren't there for looks! My Wife
likes the sound much better than before, and it looks so much
better. )
Begin
Well, after installing my K&N filter
the "Traditional" way (i.e. The
Steve Calbert method using a 3" rubber coupling & attaching it to the
throttle body). I was not happy with the way the PCM is left in limbo
doing this, and didnąt want to fabricate a bracket to hold it in place.
This method leaves the factory airbox/fender grommet/PCM in it's factory
original location, and aids in replacing the cone intake back to the
stock intake system, in case you wanted to take the car in for warranty
service and didnąt want a service manager giving you a hard time.
Literally, if you have the extra intake hose described below, I can swap
from the cone filter setup back to stock in less than 3 minutes. Really!
Itąs easy!
I cut part of the original factory air intake "hose" off (yes, it's $63
Part (retail) $48 Part (trade cost), GM Part #25165727 (and, it includes a new IAT!).
I kinda figure that since the car's worth $25K, you should be able to afford a $50 part.
Tools
Required: