Installing a Transmission Temperature
Gauge
A transmission temperature gauge of your choice an be
purchased from most speed shops or The Grand Prix
Store. The type of gauge is irrelevant, you can choose whichever you like the best.
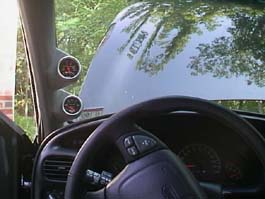
You will need to decide the location to mount the gauge, but an A-pillar gauge mount is
available as a professional location to mount two gauges. Contact Grand Prix Store for details.
These gauge mounts can be purchased from The Grand Prix Store. Both 2 and 3 pod mounts are available.
Begin by locating the throttle body. Just below it is the transmission. On top of the
transmission you will be able to see two "nipples". The lower and closest to the
firewall is what we are concerned with. This is a pressure test port that can be used.
There's a simple threaded plug in there. Simply remove it with a ratchet.
Install the provided sending unit into the threaded port as shown below. The small
copper-colored sender with the gray wire is what we're looking at here:
![]()
(click to enlarge)
-- it should be the same thread size as the plug. Make sure it fits snugly. Here's another look. You can see it in the back of the transmission:
![]()
(click to enlarge)
A tip when installing the signal wire is to put a few
drops of removable thread lock on the mounting nut to keep if from working loose.
Install the signal wire and route it securely away from the transmission.
Run the signal wire into the passenger cabin. There is a
wire harness that runs through the firewall just above the passenger's footwell that is a
good location for this wire.
Run the wire to the signal input of the transmission temperature gauge inside the cabin and supply a switched power source for the backlight. Another document is available that describes how to do this.
Don't forget to hook up 12V power. Why do you need 12V power? Because the gauge is an electrical (unlike a boost gauge, for example, which is mechanical). But I already hooked up my gauge lighting - isn't that good enough? No - the power for the lamp is used only for the lamp. The gauge needs an electrical signal that's not variable (unlike the dimmer you already hooked up - it's not always 12V and varies with a turn of the dimmer dial) so that it converts the signal from the sender into a mechanical movement of the gauge needle. Here's how to do it.:
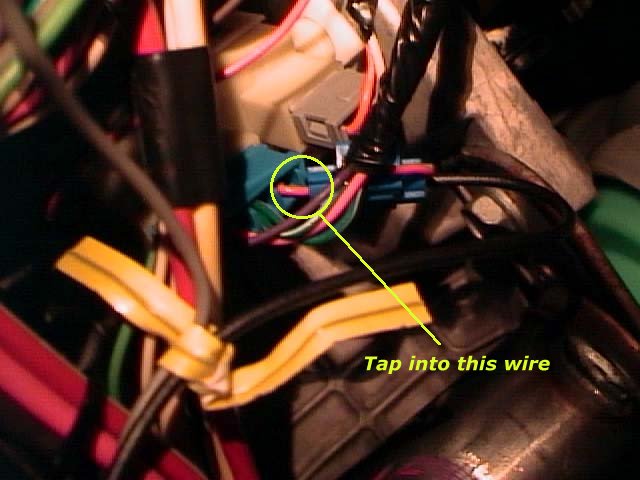
Pop off the cardboard panel under the dashboard on the driver's side. Pop the light out of the panel and move the panel out of the way. Directly under the steering column, you'll see a small blue connector with a few wires on it. Find the hot pink wire that is located as shown below (it's hard to see in the small version, so click the picture to view the larger version). Notice the position of this wire is the last in the connector. There is only a small portion of this wire exposed, so take care to do this right the first time. Tap into this line, and connect this to your gauge for the power source (12V).
Another possible 12 volt switched source is located down by the passenger foot well area. Remove the glove box door and slide out the glove box assembly. Located at the back of the glove box compartment is a bundle of wires taped to a support bar. This bundle is clearly marked at AUXILIARY POWER DROP. In the drop is a 12 volt constant, 12 volt switched, and ground. You can tap into these wires to provide power for your gauges. This location is a little easier to work with, but does require a bit more wire. Either location will work regardless.
Questions? Ask Steve Calbert (scalbert@flwsoutheast.com)